The Best Fluffy Pancakes recipe you will fall in love with. Full of tips and tricks to help you make the best pancakes.

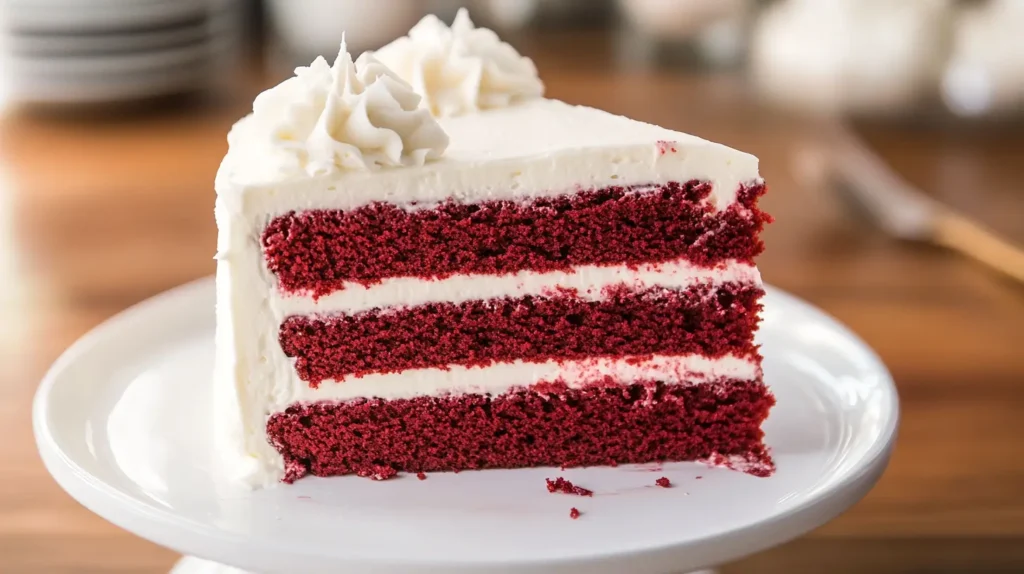
Have you ever had one of those days when nothing but something sweet and decadent would do? I’ve been there more times than I care to admit! That’s where this classic Red Velvet Cake recipe comes to the rescue. With its stunning crimson layers and velvety cream cheese frosting, red velvet cake isn’t just dessert—it’s an experience that brings people together. Whether you’re celebrating a birthday, hosting a holiday gathering, or simply craving something special on a Tuesday night, this recipe delivers that perfect balance of rich flavor and impressive presentation without requiring a culinary degree to pull off.
Table of Contents
Why You’ll Love This Red Velvet Cake
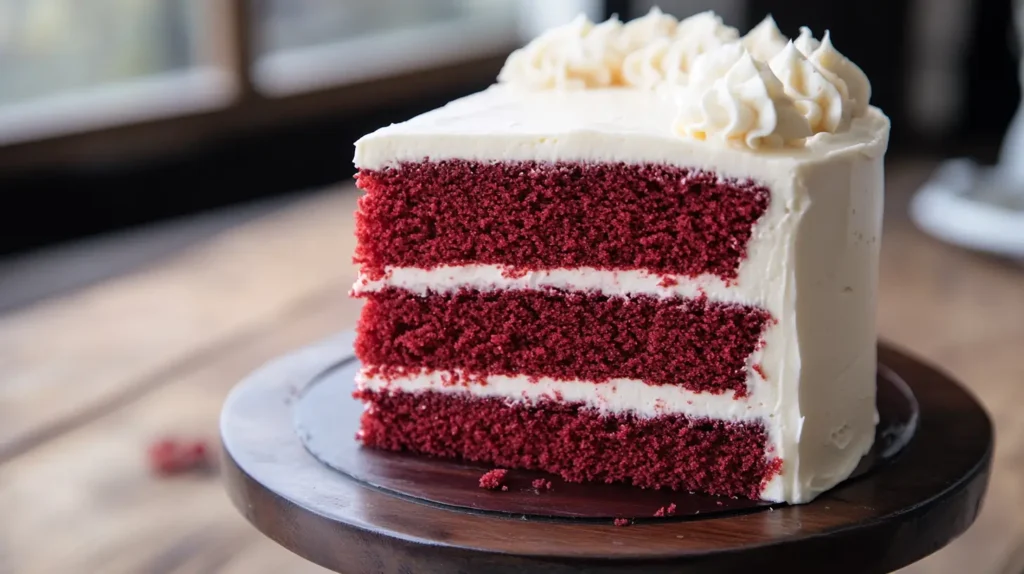
Let’s be honest—we’ve all been intimidated by gorgeous cake photos that look like they require professional pastry skills. But here’s the thing about this red velvet cake: it’s surprisingly forgiving! The cake itself is wonderfully moist with just the right hint of cocoa (not too chocolatey, not too plain), while the cream cheese frosting adds that perfect tangy complement that keeps everyone coming back for seconds.
What makes this red velvet cake special is how it manages to feel both fancy and approachable at the same time. It’s the cake equivalent of your favorite dress that somehow works for both office meetings and dinner dates—versatile, reliable, and always makes you look good!
The Secret History Behind Red Velvet
Before we dive into measuring cups and mixing bowls, can we take a moment to appreciate the fascinating history of red velvet cake? This Southern classic wasn’t always the vibrant red showstopper we know today. Originally, the reddish hue came from a chemical reaction between cocoa powder, vinegar, and buttermilk. It wasn’t until the 1940s that bakers began adding red food coloring to enhance that signature color.
Now, this beloved cake has found its way into bakeries, restaurants, and home kitchens across America, evolving from regional specialty to national treasure. When you bake this red velvet cake, you’re not just creating dessert—you’re participating in a delicious piece of American culinary tradition!
Let’s Get Baking: The Ingredients You’ll Need

For the Cake:
- 2½ cups all-purpose flour
- 1½ cups granulated sugar
- 1 teaspoon baking soda
- 1 teaspoon salt
- 1 teaspoon cocoa powder
- 1½ cups vegetable oil
- 1 cup buttermilk, room temperature
- 2 large eggs, room temperature
- 2 tablespoons red food coloring (1 oz)
- 1 teaspoon white distilled vinegar
- 1 teaspoon vanilla extract
For the Cream Cheese Frosting:
- 16 oz cream cheese, softened
- ½ cup butter, softened
- 4 cups powdered sugar
- 1 teaspoon vanilla extract
Bringing Your Red Velvet Cake to Life
Step 1: Prep Work (Because Nobody Likes Mid-Recipe Panic)
Preheat your oven to 350°F. I don’t know about you, but I’ve definitely had those moments where I’m halfway through mixing ingredients before realizing my oven isn’t heating up! Let’s grease and flour two 9-inch round cake pans, or line them with parchment paper if you’re like me and want that extra insurance against cake sticking disasters.
Step 2: Mix Your Dry Ingredients
In a medium bowl, whisk together the flour, sugar, baking soda, salt, and cocoa powder. This might seem like the boring part, but properly mixed dry ingredients are the foundation of a perfectly textured cake. Think of it as setting the stage for the star ingredients to shine!
Step 3: Bring On the Color and Flavor
In a large bowl (and I mean large—red food coloring has a sneaky way of jumping onto countertops and white shirts!), beat the oil, buttermilk, eggs, food coloring, vinegar, and vanilla with an electric mixer until well combined. If you’re worried about the red color staining your favorite mixing bowl, use a glass or metal one instead of plastic.
Can we talk about the buttermilk for a second? If you don’t have it on hand (because who keeps buttermilk in their fridge at all times?), you can make a quick substitute by adding a tablespoon of lemon juice or white vinegar to a cup of milk and letting it sit for 5 minutes.
Step 4: Combine Wet and Dry Ingredients

Gradually add the dry ingredients to the wet ingredients, mixing at low speed until just combined. The batter should be smooth and—you guessed it—a gorgeous red color. Resist the urge to overmix! This is where many cakes go from tender to tough. Just mix until no flour pockets remain, then step away from the mixer.
Step 5: Bake to Perfection
Divide the batter evenly between your prepared pans. Give them a gentle tap on the counter to release any air bubbles. Slide those beautiful red layers into your preheated oven and bake for 25-30 minutes, or until a toothpick inserted in the center comes out clean.
Is there anything better than the smell of cake baking? It’s like a warm hug for your kitchen. This is the perfect time to make yourself a cup of coffee and start planning who you’ll share this masterpiece with (or not—no judgment here!).
Step 6: The Cooling Period (AKA The Hardest Part)
Let the cakes cool in their pans for about 10 minutes, then transfer to a wire rack to cool completely. I know it’s tempting to rush this step, but trust me—frosting a warm cake is a slippery slope to disaster. Use this time to clean up your kitchen or prepare the frosting.
Step 7: Whip Up That Dreamy Frosting
In a large bowl, beat the softened cream cheese and butter until smooth and creamy. Gradually add the powdered sugar, mixing well after each addition. Stir in the vanilla extract. If the frosting seems too thick, you can add a tablespoon of milk to reach your desired consistency.
This frosting is seriously good enough to eat with a spoon. I won’t tell if you sample a little more than necessary for “quality control.”
Step 8: Assemble Your Masterpiece
Place one cake layer on your serving plate. Spread a generous layer of frosting on top, then carefully position the second cake layer. Cover the top and sides with the remaining frosting. For a classic look, you can leave the sides slightly exposed for that rustic “naked cake” effect that’s so popular right now.
If you’re feeling fancy, reserve some frosting and pipe decorative borders or rosettes on top. But honestly? This cake is stunning even with simple swoops and swirls.
Red Velvet Troubleshooting: Real Talk for Real Bakers
Let’s be real—even experienced bakers have off days. Here are some common red velvet cake challenges and how to overcome them:
Problem: My cake layers sank in the middle.
Solution: Your oven might be too hot, or you might have opened the oven door too early in the baking process. Next time, use an oven thermometer to verify the temperature, and resist peeking until at least 20 minutes have passed.
Problem: My red color isn’t vibrant enough.
Solution: The acidity matters! Make sure your buttermilk and vinegar are fresh, and consider using gel food coloring instead of liquid for more intense color without adding extra liquid to the batter.
Problem: My frosting is too runny.
Solution: Your cream cheese or butter was probably too warm. Pop the frosting in the refrigerator for 15-20 minutes, then beat again until it reaches spreading consistency.
Serving Suggestions and Storage Tips
Red velvet cake is beautiful on its own, but want to take it to the next level? Serve slices with fresh berries, a dusting of cocoa powder, or even a small scoop of vanilla ice cream for special occasions.
If you’re making this cake ahead of time, you can refrigerate it for up to 3 days. Just be sure to bring it to room temperature about an hour before serving for the best flavor and texture. The cake layers can also be frozen (unfrosted) for up to a month—perfect for planning ahead for that birthday or holiday celebration!
Why This Red Velvet Cake Stands Out
What I love most about this red velvet cake recipe is how it brings people together. There’s something about those rich red layers that makes everyone’s eyes light up when you set it on the table. It’s the kind of dessert that creates memories—whether it’s your child’s birthday party, a holiday gathering, or just a Sunday dinner made special.
And can we talk about how versatile red velvet is? The same batter works beautifully as cupcakes (just reduce the baking time to about 18-20 minutes). You can even transform it into cake pops, trifles, or those trendy cake jars for gifting.
Your Red Velvet Questions, Answered
Can I make this cake without food coloring?
Absolutely! You’ll miss the vibrant red color, but the cake will still taste delicious. Some bakers use beet powder as a natural alternative, though the color tends to be more subtle.
Is red velvet just chocolate cake with red food coloring?
Not quite! Red velvet contains just a hint of cocoa powder—much less than a traditional chocolate cake. The combination of buttermilk, vinegar, and that touch of cocoa creates its distinctive flavor profile that’s not quite chocolate, not quite vanilla, but entirely its own delicious category.
Can I make this as a sheet cake instead of layers?
Yes! Pour the batter into a 9×13 inch pan and bake for about 35-40 minutes. You’ll need less frosting, so consider reducing the frosting recipe by one-third.
My family doesn’t like cream cheese frosting. What else works?
While cream cheese frosting is traditional, a vanilla buttercream also pairs beautifully with red velvet cake. Some Southern bakers even use an old-fashioned ermine frosting (also called boiled milk frosting), which was actually the original frosting for red velvet before cream cheese became popular!
There you have it—everything you need to create a stunning red velvet cake that will have everyone thinking you’ve been taking secret pastry chef classes. Remember, the joy of baking isn’t just in the perfect end result but in the process itself. So put on your favorite music, embrace the occasional mess, and enjoy creating something delicious from scratch. Your red velvet cake isn’t just dessert—it’s an expression of love and creativity that brings a little more sweetness to everyday life.
For more delicious recipes, check out our other cake recipes on the website!